After finishing the previous section of this tutorial, you should have a static web page displaying a title, some text, and an image; the source code should look something like this:
<!DOCTYPE html>

<html>

<head>
  <meta charset="utf-8">
  <title>Newton's Cannon</title>
</head>

<body style="font-family:sans-serif; font-size:15px; width:600px;
    margin-left:auto; margin-right:auto;
    background-color:#e0e0e0;">

  <h1 style="font-size:24px; text-align:center;">
    Newton's Cannon
  </h1>

  <div style="width:500px; margin-left:auto; margin-right:auto;">
    <img src="NewtonDrawing.jpg" width="500" height="500">
  </div>

  <p>This simulation is based on Isaac Newton's famous thought
  experiment and illustration of firing a projectile from a high
  mountaintop at various speeds, as he described in
  <a href="http://books.google.com/books?id=DXE9AAAAcAAJ">A
  Treatise of the System of the World</a>.</p>

</body>

</html>
In the following steps you will bring this page to life with animated graphics.
The HTML5 canvas element provides an initially blank rectangular space where you can
draw using low-level graphics instructions. Here’s the syntax for inserting a
canvas:
<canvas id="theCanvas" width="500" height="500">
  Canvas not supported; please update your browser.
</canvas>
The content that you put between the opening and closing canvas tags
will be displayed only in older browsers (most notably Internet Explorer 8 and earlier)
that don’t support canvas. As with img, the width
and height attributes are given in units of nominal screen pixels. The id
attribute is simply a unique name by which your code can identify this canvas.
Please insert this code in your web page, right after the img element
(and inside the div). Then test it, and note that your page now has a 500-pixel-high
blank space just below the image. That’s the canvas, but we want it in
front of the image, not underneath.
To move the canvas in front of the image, you need to use CSS absolute
positioning. Simply insert style="position:absolute;" in the img
tag, and style="position:relative;" in the opening canvas tag.
Although it isn’t necessary here, I also recommend adding position:relative;
to the style of the enclosing div.
Basically, position:absolute tells the browser to go ahead and place the
element as usual, but then back up and place the next element as if the absolutely
positioned element weren’t there. The explanation of position:relative
(relative to not setting the position property at all) is more technical,
but it works. In any case, please make these changes now and check that the page layout
looks the same as it did before the canvas was there.
You now have an invisible space where you can draw. To actually draw on it, you need to add some JavaScript to your page.
JavaScript is a programming language that you can
use to manipulate anything and everything on a web page, changing the page from mere static
information into a dynamic program (usually with user interactivity). To insert JavaScript
code into a page you use the script element, like this:
<script>
  // JavaScript code goes here.
</script>
The script can be placed inside either head or body,
but I usually put it in the latter, after all of the page’s visible content. So please
do that, and then put the following JavaScript code inside the script:
var theCanvas = document.getElementById("theCanvas");
var theContext = theCanvas.getContext("2d");
theContext.beginPath();
theContext.arc(300, 50, 5, 0, 2*Math.PI);
theContext.fillStyle = "red";
theContext.fill();
The first line searches your page for an HTML element with id="theCanvas",
and gives your JavaScript code access to this element through a variable of the same name.
(You could use a different name for the variable, and actually most browsers will create
a variable with the same name for you by default, but it’s a good idea to make it explicit.)
The second line is needed for technical reasons: It gives you access to what’s called
the canvas’s graphics context, which is what you use for the actual drawing.
Once you have that, the next four lines draw a red filled circle on the canvas, centered
at pixel coordinates (300, 50), with the second coordinate measured down from the top.
The radius of the circle is 5 pixels, and the last two arguments of the arc
function specify the beginning and ending angles (in case you ever want to fill a pie slice
instead of a full circle).
Go ahead and test this JavaScript code, then try changing the location and size and color of the red circle. (Besides common color names like "red", you can use hexadecimal codes of the form "#rrggbb", just as in CSS.)
These six lines of JavaScript illustrate several important features of the language’s syntax:
= symbol is used to set the value of a variable.In fact, most of the syntax of JavaScript is ultimately borrowed from C, and from its
descendants such as C++ and Java, so if you already know one of these
languages, you won’t need to learn much new syntax. However, the higher-level features
of JavaScript are quite different from these other languages and may take more getting used to.
For example, all JavaScript variables are declared using the var keyword,
rather than by specifying a particular data type such as int or double.
This is because JavaScript variable types are determined automatically as
your program runs—a feature that many of us find unsettling.
Our next goal is to put that red dot (which will represent the launched projectile) into motion.
First, insert two more lines of JavaScript, somewhere before beginPath, to
define general coordinates x and y for the center of the dot:
var x = 300;
var y = 50;
Then, in the line that calls the arc function, change the constants 300
and 50 to x and y. These changes should have no effect
by themselves, but now you can move the four graphics instructions into a self-contained function
that will work for any x and y values. To create your own function in
JavaScript you use the function keyword (analogous to var for variables),
like this:
function drawProjectile() {
    theContext.beginPath();
    theContext.arc(x, y, 5, 0, 2*Math.PI);
    theContext.fillStyle = "red";
    theContext.fill();
}
(Again the syntax is taken from C, using curly braces to group together the statements
that are part of the function definition.)
In addition, you need another function that will change the values of x and
y. Let’s call this one moveProjectile:
function moveProjectile() {
    x += 1;
    drawProjectile();
    window.setTimeout(moveProjectile, 1000/30);
}
Here the first statement adds 1 to the value of x (you could alternatively
write x = x + 1); the second statement
calls the drawProjectile function; and the third statement tells your browser
to call the moveProjectile function again in 1000/30 milliseconds (so it will
be called about 30 times per second). This is the “trick” that keeps the
animation going.
You still need to get the process started, by calling moveProjectile
once from outside of any function:
moveProjectile();
(Put this statement right after your variable initializations.) When you test this
code, you should see the red dot being drawn repeatedly at rightward-moving locations
across the window, right up to the edge of the canvas.
To merely move the red dot, erasing it from its previous location, you can
just erase the whole canvas at the beginning of the drawProjectile
function:
theContext.clearRect(0, 0, theCanvas.width, theCanvas.height);
(The clearRect function can be used more generally to erase any rectangular area,
where the parameters are the left, top, width, and height, respectively, all in nominal
pixel coordinates. Here you also see that the theCanvas object provides
width and height variables that you can use as needed.)
Again, be sure to test this change to your code.
This method of erasing and redrawing the projectile might seem cumbersome, especially
compared to higher-level graphics environments in which you could simply change the values of
x and y and see the object move automatically in response. That higher-level
approach is called retained-mode graphics, and it’s more convenient for animating
the motions of a limited number of objects. The canvas
element, instead, implements what’s called immediate-mode graphics, in which
each shape is immediately drawn as pixels and only the pixels themselves are stored in
the computer’s memory. Immediate-mode graphics provides better performance for complex
images that cannot be reduced to a few hundred (or fewer) discrete lines or polygons. Should you ever
want a retained-mode environment for your animations, you can learn one of
the JavaScript libraries that implements
retained-mode graphics on top of canvas.
Of course you don’t want the projectile to move in an arbitrary way; you want it to move
in response to earth’s gravity. So please remove the statement x += 1
from your moveProjectile function and replace it with some physics calculations,
starting with these variable definitions:
var newtonG = 6.67e-11;        // grav. constant in SI units
var earthMass = 5.97e24;       // kilograms
var dt = 5;                    // time step in seconds
var r = Math.sqrt(x*x + y*y);
var accel = newtonG * earthMass / (r * r);  // magnitude of a
Here you see how to enter numbers in scientific notation and how to do some simple
arithmetic, including a square root. Note that JavaScript (like C and Java) has no
exponentiation operator, so to square a number you just multiply it by itself.
As in Java and C++, the double-slash indicates the start of a comment, which continues
to the end of the line.
I should also explain that by declaring these new variables (with var) inside
your moveProjectile function you are making them local to that
function, so they aren’t available to any of the rest of your code, and their
values disappear between successive calls to the function. The alternative is to
make a variable global, which you do by declaring it outside of any function
(as you did with x and y). It’s a good habit to make
variables local whenever possible. (Unfortunately, JavaScript doesn’t actually
require you to declare variables at all—but any undeclared variables automatically
become global, and this can result in buggy code. Please declare all your variables!)
The last line of code above calculates the magnitude of our projectile’s acceleration,
using Newton’s law of universal gravitation. (The projectile’s mass cancels out.)
Notice how I’ve assumed that x and y are now measured in meters,
from the center of the earth.
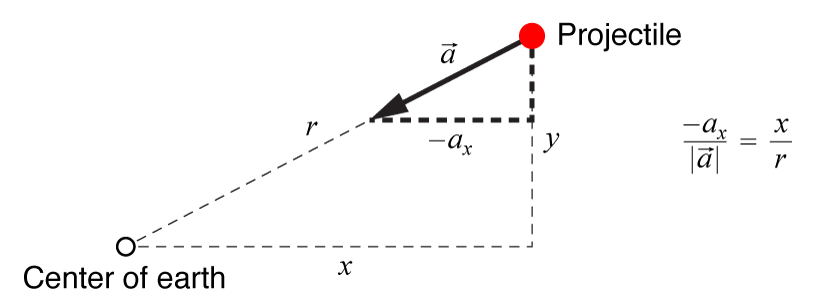
We can find the x and y components of the acceleration vector with the aid of a sketch:
From the similar triangles you can see that the x component of the acceleration vector is minus its magnitude times the ratio x/r, and similarly for the y component. The code to compute these components is therefore:
var ax = -accel * x / r;
var ay = -accel * y / r;
From these acceleration components you can now update the components of the projectile’s velocity, and then use these to update the position:
vx += ax * dt;
vy += ay * dt;
x += vx * dt;
y += vy * dt;
I’ve already chosen a dt value of 5 seconds, which is quite short
compared to the natural time scale for a low-earth orbit (on the order of an hour).
But because dt isn’t infinitesimal, this algorithm predicts the projectile’s
motion only approximately. The particular approximation used here is sometimes called the
Euler-Cromer algorithm;
it improves upon the standard Euler algorithm by using the new velocities, rather than the
old ones, to update the positions.
Besides inserting all this code into your moveProjectile function, you also
need to declare and initialize the velocity variables. Since their values need to persist
through multiple calls to moveProjectile, you should declare them at the
global level:
var vx = 6000;   // meters per second
var vy = 0;
While you’re at it, you’d better properly initialize the position:
var earthRadius = 6371000;   // meters
var mountainHeight = earthRadius * 0.165;  // chosen to match image
var x = 0;
var y = earthRadius + mountainHeight;
Finally, in your drawProjectile function, you need to convert the
physical coordinates into canvas pixel coordinates:
var metersPerPixel = earthRadius / (0.355 * theCanvas.width);
var pixelX = theCanvas.width/2 + x/metersPerPixel;
var pixelY = theCanvas.height/2 - y/metersPerPixel;
The number 0.355 in the first line is chosen to match the image, and the minus sign
in the last line is because the pixel coordinate is measured down from the top.
Now just use pixelX and pixelY instead of x
and y in the arc function (there’s no need to round
these values to integers), and it should all work. Try it!
One piece of physics that’s still missing is the earth’s hard surface.
To stop the simulation when the projectile hits the ground, all you need to do is enclose
most of the code in moveProjectile in an if statement:
var r = Math.sqrt(x*x + y*y);
if (r > earthRadius) {
    var accel = newtonG * earthMass / (r * r);
    // and so on...
}
(Let’s continue to neglect the rather dramatic effects that earth’s atmosphere would have on a projectile moving several kilometers per second!)
Of course, the whole point of the simulation is that for sufficiently high initial
speeds, the projectile will never hit the ground. In that case you probably want
to stop it after a complete orbit. You can do so by saving the old value of x
just before you update it, and then testing whether x has changed from
negative to positive:
var lastx = x;
x += vx * dt;
y += vy * dt;
drawProjectile();
if (!((lastx < 0) && (x >= 0))) {
    window.setTimeout(moveProjectile, 1000/30);
}
(Note the use of the logical operators && for and and
! for not.)
It would be astonishing if by this time you haven’t made at least one typographical or other error while entering your JavaScript code. In that case, you may have found that the code simply fails to run, with no apparent explanation.
Fortunately, you can get an explanation in such cases by viewing your browser’s JavaScript console. The way to view it varies with different browsers; it may be called something like Web Inspector, perhaps under a special Developer menu that you have to enable. If you haven’t already, take the time to find it now, and then check out what it shows when you introduce a fatal error into your code (perhaps misspelling one of the variable names). The console should display an error message, the most important part of which is the line number of the offending code. This would also be a good time to configure your text editor to display line numbers in the left margin, if it isn’t already doing so.
Of course, the more troublesome bugs are those that don’t generate error messages
but still cause your program to produce incorrect results. To diagnose those, you can use
the console.log function to send your own diagnostic messages to the console:
console.log("Entering drawProjectile function");
console.log("Current position is " + x + ", " + y);
The second example also illustrates how the + operator can be used
to concatenate text strings, and how JavaScript automatically converts numbers to strings when
necessary.
This was a long section of the tutorial, but it covered a lot of material: the
JavaScript programming language, the HTML5 canvas element, and an algorithm
for integrating Newton’s second law to predict the motion of a projectile.
I’ve prepared one-page reference sheets on JavaScript and Canvas graphics, which give an overview of the features covered here and a number of other useful features. The example pages that accompany this tutorial also demonstrate several features of these technologies.
For more comprehensive references, you can try W3Schools
and also the HTML5 Canvas Tutorials site.
Stack Overflow is again an essential resource.
The definitive book on JavaScript is David Flanagan’s
JavaScript: The Definitive Guide,
which includes a chapter on canvas graphics. A nice book that’s dedicated
to the latter is Core HTML5 Canvas by David Geary.
To learn more about solving Newton’s second law (and other differential equations) on a computer, some of the best textbooks are Numerical Methods for Physics by Alejandro Garcia, Computational Physics by Giordano and Nakanishi, and Introduction to Computer Simulation Methods by Gould, Tobochnik, and Christian.
Next: User Interaction