Astronomy Projects
With contributions by John Sohl, Shane Larson, and Daniel Schroeder
The heart and soul of astronomy is observing. You must look
at the sky to become familiar with the sky. Part of your experience
in this class will be book-learning, but another part will be
actually going out and looking at the sky yourself. There are a
variety of activities that can be done, and the contents of this guide
are by no means an exhaustive list. Read through and find something
that is of interest to you, and then go out and see the sky!
Observing Safety
Many observing projects can be done from your own back yard, but
sometimes it is necessary or more convenient to find a location away
from city lights. When observing at night, it is always best to
do it with a friend or in a group. (However, you should not let someone else do your
observing for you. You must make your own observations and notes and write your own report!)
If you need help coordinating the
opportunity to observe at night with a group, see your instructor.
Do not observe alone at night if you do not feel safe!
Observing Equipment
The equipment you'll need depends on which observing project you choose,
but may include several of the following:
- Eyeballs. There's no substitute for
these! Be sure to treat them well and, when necessary, give them
time to adapt to the dark.
- Pen, notebook, observing records.
The point in observing is to record what you see. Records should
not be kept on scraps of paper, on the backs of old phone bills,
or on paper bags from McDonalds. Keep your records organized,
either in a binder or in a bound notebook. Sketching is sometimes
required; your personal preference may be to use pen, or perhaps
your artistic streak demands you use pencils. Make sure you bring
extras!
- Warm clothing. Even during the
summer months, it can get cold out in the dark. Always
take several warm layers of clothing, a heavy jacket, and hat and
gloves with you when observing. Additionally, in the winter warm
footgear will be valuable for keeping you warm.
- Redlight. Several of the projects must be done in dark locations,
with dark-adapted eyes. To maintain your dark
adaptation, you can use a red flashlight to see your notebook
and find your way around your observing area. Ordinary
flashlights can be made into redlights by covering the lens with
several layers of red cellophane. Red LED keychain lights are
also reasonably easy to find. There are also a variety of
redlights commercially available for the amateur astronomy
community.
- Angle measurers. In some
instances you will need to measure precise angles for the
observing projects; each project will describe how to do this if
needed. If angles are requested, but no equipment is described,
the angles can be estimated using the equipment you have
with you--your hands! The illustration below
shows the common angular estimates used in astronomy. Your
fist at arms length is about 10 degrees across, and your
spread hand held at arms length is about 20 to 25 degrees
across. Some astronomers also use the widths of
their fingers for smaller angular measures. These rules of thumb
work reasonably well for most people.
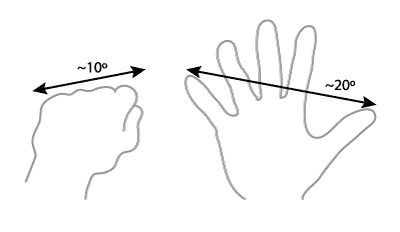
Angular estimations for astronomy (with hand held at
arm's length).
- Binoculars, telescopes, cameras.
While these expensive tools aren't needed for most of the projects,
you can certainly use them if you wish. If you have one of these
items and want to know what you can do with it, please consult
with your instructor.
Observing Records
The most important element of
recording astronomical observations is making sure all the critical
information gets written down and can easily be found at a later time
when you go back to your records for analysis.
Certain information is always
needed with every observation you make. This includes:
- Date & Time. Far and away, this
is the most important data relating to your observations. Make sure you
indicate AM/PM, what time zone you
are in, and whether daylight savings is in effect. If you
are observing at night, make sure to be aware that the date
changes at midnight!
- Location. Where were you when you
made the observations? On the corner of Harrison and 36th? At
the Lagoon Amusement Park? On Weber State University Campus, near
the Clock Tower? Or at 45° 06.13' N, 111°
12.92' W? Wherever you are, you must record the location precisely.
- Sky conditions. What were the skies
like when you were looking? The most valuable information is the
conditions (cloudy, hazy, clear), the light pollution (dark,
nearby city, downtown Ogden), and sometimes the "seeing" (steady skies, lots
of twinkling, etc.). Light pollution is often indicated by what
can be seen (can you see all the stars in the Little Dipper? Is the
Milky Way visible? Can you see the Andromeda Galaxy with your
naked eye?).
Different observing projects may require different types of record
keeping. A project involving simple star counts may require only a
detailed table of data, while other projects
will require more elaborate notes and sketches.
Observing records are also somewhat like a
running astronomical diary, keeping record of all your experiences
while out observing. Did you get lost on your way? Did you meet
someone who had never looked at the Moon through binoculars before,
and took a peek through yours? Did the Ogden Police stop by to ask
why you were looking at the sky through a paper towel tube? Did a
herd of deer wander past the telescope and freak you out? Write these
experiences down!
Reports
Reports on observing projects should be well organized and neatly typed, with the
following elements in the writeup.
- Observer's Name & Project Title.
I have to know who deserves credit for the fantastic
observational work I have before me. I also have to know what the
project is about.
- Project Description & Goals. Start with a short
description of the project telling what your goals were and what you
observed.
- Equipment & Observing Methods.
Describe the equipment you used and your general observing
procedures.
- Observing Data.
Include your original observing data, whether it be sketches and observing
records, or tabular data, depending on the requirements of a given project.
(Data tables need not be typed but must be neatly written.)
- Analysis & Summary. Most
projects will require some analysis to complete. In all
cases you should write a short summary describing your final
results and what you learned from
the project (new skills, new objects discovered, etc).
- Audience. Your report should be
understandable by any of your classmates, who should be able to
repeat your observations and analysis without any other instructions.
Do not assume that your reader is familiar with the instructions for
your project.
- Attribution. Although you must make all your own observations, you
are welcome to consult other people or written materials for additional information.
Whenever you do so, your report must clearly indicate both the source and what information
you got from it.
- Good English. Your report should be written in your best English, with correct
spelling, punctuation, and grammar. Choose words carefully, and organize your writing into
good sentences, paragraphs, and sections.
Please do not encase your report in a plastic binder or other unnecessary frills.
Collaboration
Working with a classmate on a project is a good idea not only for safety, but also so you can
share ideas and advice, and perhaps have a helper to assist with taking notes
or holding a flashlight. However, you must make all your observations with your own eyes, and you must write
your own report. If you wish to share a camera for a photographic project, you must consult with
your instructor in advance; typically you will then be required to take twice as many photos.
In all cases, if you work with someone else, you must name that
person in your report and explain exactly how you helped each other.
List of Projects
The following list of projects comes from a variety of sources. Many are traditional projects that have been
done by millions of people around the world, and others have been
developed more recently. For this course you must choose two different
projects from the list. Click on the links to find detailed instructions for each project.
Note that some of these projects must be done over long periods of time, so plan ahead and
start early! Also note that all of the projects require clear weather, and that
some projects can be done only during certain phases of the moon.
- Sun Journal. Observe the position of the rising or setting sun over a period
of two months. For this project you need to be at the same location for each observation. You'll need to make
at least one observation every two weeks,
being somewhat flexible about the exact day to allow for cloudy days. This is a long-term project so
be sure to start early! Click here for full instructions.
- Moon Journal. Observe the phase of the moon as many days as possible over the
course of a month. For this project your observations can be made at any time of the day when the
moon and the sun are both visible, and from any location. You can start at any time but you must make
at least a dozen observations, spread over an entire month. Click here for full instructions.
- Measure the Size of the Earth. Build a simple device to measure angles accurately,
and use it to measure the position of the north star from two locations. This is a great project if you're planning
a trip of at least 150 miles north or south. The observations require only a few minutes each from two locations, but
the night sky must be clear. Click here for full instructions.
- Measure the Size of the Sun. Construct a simple pinhole projection device and
use it to determine the sun's diameter. This project can be done on any sunny day. Click here for full instructions.
- Count the Stars. Aim a cardboard tube at the sky and count how many stars you see
through it, from three different locations. This project requires a couple hours of observing on a single
clear night with little or no moonlight. You'll need to drive to different locations, including one location
that is at least a half hour away from civilization. Click here for full instructions.
- Observe the Moons of Jupiter. Follow in Galileo's footsteps! Observe the moons of Jupiter
over a period of a few nights, using a small telescope such as the new Galileoscope. This project
can be done from almost any location. Click here for full instructions.
- Photograph Circumpolar Stars. Make a series of photographs
of the North Star and surrounding stars, either over one long night or over the course of two months,
to show the stars' apparent rotation. (A wide variety of cameras, though not all, can be used
for this project.) Click here for full instructions.
- Photograph Star Trails. This is a great project if you have a digital
SLR camera or an SLR film camera, plus a tripod and a way to keep the camera shutter open for several minutes.
You'll take a few long-exposure photos to show the apparent motion of the
stars, and measure the rate at which they appear to move. You must make your photographs from
a reasonably dark location when the moon isn't too bright.
(Because this project overlaps with the Circumpolar Stars project, please do not choose both.)
Click here for full instructions.
- Photograph Planetary Motion. Photograph the motion of a planet, with respect to the
background stars, over the course of several weeks. A digital camera is best for this project, although
it doesn't have to be especially fancy. Please see your instructor for details if you
are interested in this project.
- Photograph the Milky Way. For this project you need a digital SLR camera and tripod, or
an SLR film camera with a tracking mount (which you can make yourself). You also need to travel to a very
dark site on a clear, moonless night. Please see your instructor for details if you are interested
in this project.
In all cases, be sure to follow the links to the detailed project instructions (or consult with your
instructor). If you would like
to design your own project that is not on this list, please consult with your instructor.
Grading Scheme
In grading your project report, your instructor will ask questions like these:
- Did you follow the project instructions completely and correctly?
- Did you keep a complete record of all your observations and include this information in your report?
- Is your report vivid enough for the reader to visualize exactly what you did?
- Is your analysis thoughtful, accurate, and well described?
- Does your report provide enough context to explain the significance of your observations?
- Is your report well organized and written in good English?
- Is your report interesting to read?
Each project report is worth a maximum score of 20 points. Here are some hypothetical
examples of various scores and the reasons for them:
- 20: A truly outstanding project in which the student has followed all the instructions,
written an excellent report, and done additional work that goes beyond what is explicitly required.
- 18: A project in which the observations and report are complete and essentially flawless,
though not extraordinarily creative. Or perhaps an especially creative project that still
falls short in some other way.
- 16: A project that is generally good and complete, but that contains one or two minor flaws.
These flaws might be in the observations, record-keeping, analysis, or written presentation.
- 14: A good project that may contain one major flaw or several minor ones.
Despite the flaws, the project's main goals were accomplished.
- 10: A project with more than one major flaw. Perhaps the observations are incomplete and
the report is poorly written. However, the student made a good effort and definitely learned something.
- 5: A project that is seriously incomplete or flawed in many ways. This student did some work,
but probably missed the main point of the exercise.
- 0: A project in which there is no clear evidence that the student observed the sky at all.