SKYWATCH PROJECT: CELESTIAL NAVIGATION
TIME REQUIRED: Part A: About three hours around noon
Part B: About an hour on a clear evening
PART A - SOLAR
OBSERVATIONS
EQUIPMENT REQUIRED: A smooth, sunny location, a stick (at least one foot long), a compass (to find north), a protractor, a watch and a ruler.
BACKGROUND: The gnomon, a fancy name for a vertical stick (must be thin and round) stuck in the ground, is the most ancient of all astronomical instruments. It can be used to chart the Sun's motion across the sky so as to determine one's latitude and longitude, as well as the time of true noon.
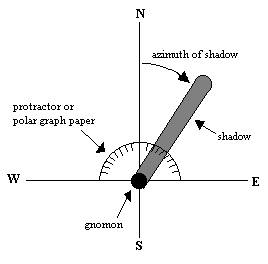
WHAT TO DO: Construct a gnomon in a location that is well exposed to the Sun. A flat, smooth (grass can make things uneven) surface is best; if the gnomon cannot be easily stuck in the ground (as on asphalt), then a small stand will help. A "plumber's helper" turns out to be ideal! Use a compass to find true north (note: compass needles point to magnetic north, which is approximately 18 degrees east of geographic or true north in the Seattle area) and draw a north-south line on the ground through the gnomon. If you can't locate a compass, estimate a north-south line. It will be best to use a large sheet of paper, well secured to the ground to prevent wind problems. A possible setup (bird's eye view) is:

From about 11:30 am to about 2:30 pm PDT (or 10:30-1:30 PST) accurately mark the position of the shadow's tip and the time of observation - every 15-20 minutes is sufficient except for 12:30-1:30 PDT (11:30-12:30 PST) when every 5-10 minutes is required. The tip's shadow will be fuzzy: you should try to mark the point halfway between the end of the dark shadow and the end of the "fuzziness". Be sure also to measure the gnomon's length above the ground. Afterwards make a table giving for each observation: (1) time, (2) length of shadow, (3) azimuth of shadow, and (4) altitude angle of Sun (calculated using trigonometry; see diagram above). Make a plot of altitude angle versus time and draw an "eyeball curve" for your data points to estimate the time of maximum solar altitude, which is called local noon. Also make a plot showing how the tip of the shadow moved in azimuth through the day.
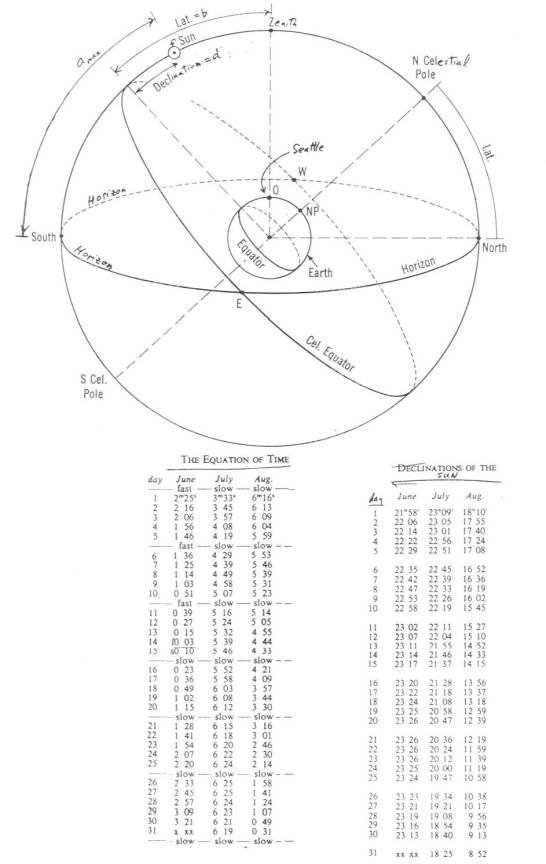
You probably will find that your measured time for the shortest gnomon shadow (Sun highest) is not exactly 12:00 am PST (1:00 pm PDT), as you might expect. There are several reasons. The first is due to the equation of time, as discussed in lecture, and this correction is supplied for you in a table on page 3. In this table "fast" means that local noon will happen before clock noon. Make this correction (and one for Daylight Savings Time if necessary) to your observed time for local noon. Any difference in your new value from 12:00 is due to the fact that your watch is set to PST, which applies to the center of the Pacific Time Zone at 120°longitude West. You can therefore use this time difference to actually calculate the longitude of your location, remembering that for each four minutes that local noon is observed to be later than 12:00, your location must be 1° of longitude farther west. What longitude do you find for Seattle? How accurate a determination do you think it is?
You can also determine your latitude using your gnomon data. Please do so. The method is a basic one used by mariners whenever they "shoot the Sun" with a sextant. Start with your measured value of the maximum altitude (amax) of the Sun. The diagram on p. 3, a fundamental one for the entire course, illustrates that the following formula is true:
b = 90° - amax + d ,
where b is your latitude and d is the declination of the Sun, that is, how many degrees north (positive) or south (negative) of the celestial equator the Sun is on that day. Through the year d changes from -23.5° (northern winter solstice) to +23.5° (summer solstice) as the tilt of the earth's axis changes with respect to the Sun. A second table on p. 3 gives you daily values for d in units of degrees and arcminutes - convert to the nearest one-tenth of a degree by remembering that 0.1° = 6'. Finally, compare your results for latitude and longitude with the accepted (map) values.
PART B - POLARIS
OBSERVATIONS
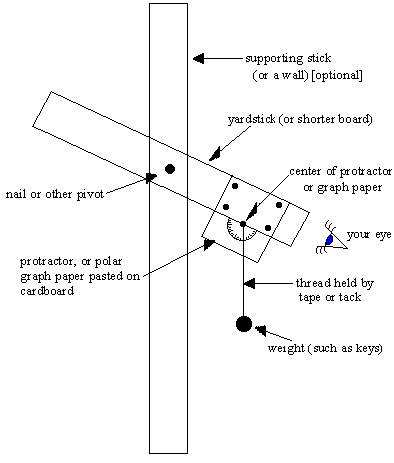
In this part you use a quadrant to measure your latitude using Polaris on one night. Your angle-measuring device is a homemade affair, as shown in the diagram on p. 2. (The vertical support shown is not really needed.) For the greatest accuracy, use as large a protractor as possible. Rather than attaching an actual protractor, it may be easier to use a large piece of paper (on cardboard) on which you've drawn all of the tick marks for angles such as a protractor shows. Make sure you understand what a scale reading of 0°or 90° means in terms of zenith or horizon. Give your results in terms of the angle above the horizon, called the altitude angle.
Sight along the stick with your eye and have a friend read the scale when you say "Now!", or, if you're by yourself, once you're lined up pinch the string so as to "lock" the movable string on the correct reading. To improve accuracy, take several readings and average. Once you have determined your latitude with Polaris, compare your measurement with a value derived from a map and with your gnomon-shadow value.
Extra Credit: The elevation of Polaris is approximately your latitude, but since Polaris is not located exactly at the North Celestial Pole (NCP), you can be off by as much as almost one degree. The essence of the correction is illustrated below. Find Cassiopeia at the time of your observation, make a sketch such as that below, and estimate the angle m ; if you forget to do so, you can use a planetarium software package as a substitute. Then, knowing that Polaris is located 50' from the NCP, use simple trigonometry to calculate the difference in altitude t between Polaris and the NCP; in the illustration the NCP is at an altitude t = 50' sin m higher than Polaris, but your situation may be different depending on where Cassiopeia is.