
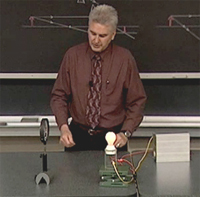
Refraction of Light
Law of Refraction
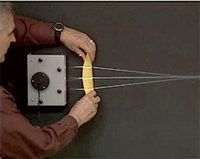
Blackboard optics is used to demonstrate refraction as light passes through a block of plastic.
Click the image to watch the video
- Blackboard optics light source
- Power supply
- Connecting wires
- Rectangular transparent plastic block
The refraction of light is briefly described using a chalkboard diagram. Then a beam of light from the blackboard optics system is projected along the chalkboard . The beam is observed to refract as it enters a block of plastic and again as it exits the block.
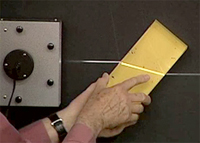
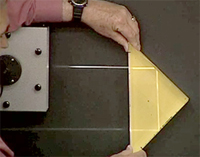
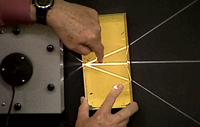
Total Internal Reflection
Total internal reflection is demonstrated for different refracting media.
Click the image to watch the video
- Blackboard optics light source
- Power supply
- Connecting wires
- Triangular transparent plastic prism
- Rectangular transparent plastic block
- Plastic light pipe
- Laser
The total internal reflection of light is briefly described using a chalkboard diagram. Then a beam of light from the blackboard optics system is projected along the chalkboard and passes into a transparent plastic prism. Total internal reflection is observed as the prism is oriented such that the internal beam reaches the critical angle. Next a transparent rectangular plastic block of relatively high index of refraction compared to air is used to demonstrate that light which is directed toward a corner of the block may not enter one surface and then leave through an adjacent surface. Finally, total internal internal reflection is demonstrated by passing a laser beam through a plastic light pipe.
Dispersion
White light is passed through a prism to produce the spectrum of colors and demonstrate dispersion.
Click the image to watch the video
- Power supply
- Connecting wires
- Triangular transparent plastic prism
- Rectangular transparent plastic block
- Glass prism mounted on stand
- Slide projector as ligh source
- Screen
The dispersion of light is briefly discussed. Then the refraction of white light through a prism is demonstrated using rays of light on a chalkboard. Next, a narrow beam of white light from a slide projector is allowed to pass through a small glass prism and the refracted beams of different colors are observed on a screen.
Apparent Depth
A plastic block is used to demonstrate apparent depth by using blackboard optics and also by using the overhead projector.
Click the image to watch the video
- Blackboard optics light source
- Power supply
- Connecting wires
- Rectangular transparent plastic block
- Overhead projector
- Transparency
- Coin
The concept of apparent depth is briefly desribed and light beams from a blackboard optics system together with a block of plastic are used to demonstrate the paths of light that lead to the apparent thickness or depth of the block. Next, in a different demonstration, a transparency and later a coin are placed on the overhead projector and brought into focus on the screen. Then a block of plastic is placed on top of these objects and it is shown how the apparent change in depth or thickness of the block requires raising the lens of the overhead projector for proper focus.
Focal Lengths of Lenses
Blackboard optics is used to demonstrate the focal lengths of various lenses.
Click the image to watch the video
- Blackboard optics light source
- Power supply
- Connecting wires
- Various blackboard optics lenses
Using chalkboard diagrams, the focal lengths of diverging and converging lenses are briefly described. Next three parallel beams of light from the blackboard optics system are projected across the chalkboard in a partially darkened room. The beams are first refracted through a diverging lens, then through a converging lens, and finally through a combination of two adjacent converging lenses. The refracted beams are observed and the focal lengths are noted in each case.
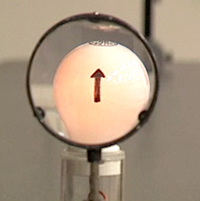
Diverging Lens
Image formation for a diverging lens is demonstrated.
Click the image to watch the video
- Diverging lens
- Lens holder
- Frosted 110 V Light bulb with arrow
- Power supply (variac)
- Connecting wires
- Jack stand
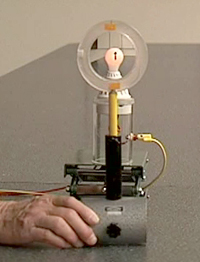
Using a chalkboard diagram, the image formation for a diverging lens is briefly described. Next a light bulb with a vertical arrow drawn on its surface, is operated at low voltage and placed behind a diverging lens. The nature of the image is observed as the object is moved toward or away from the lens.
Converging Lens - Object-Image Diagrams
Using chalkboard diagrams, image formations are described for a converging lens.
Click the image to watch the video
- Chalkboard diagrams
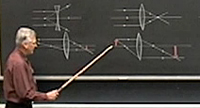
Using chalkboard diagrams, the image formation for a converging lens is briefly described. This is done with the object located at two different positions beyond the focal point and then with the object located inside the focal distance. These chalkboard descriptions are applicable to all three movies that demonstrate the image formation for a converging lens.
Converging Lens - Object at Large Distance
Image formation for a converging lens with the object at a relatively large distance is demonstrated.
Click the image to watch the video
- Converging lens
- Lens holder
- Frosted 110 V light bulb with arrow
- Power supply (variac)
- Connecting wires
- Jack stand
- Screen
- Empty socket attached to stand
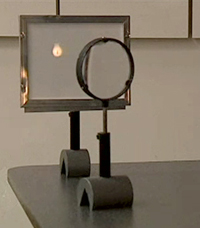
In this demonstration, a light bulb with a vertical arrow drawn on its surface is operated at low voltage and placed behind a converging lens. The nature of the image is observed on a screen in front of the lens as the object is placed behind the lens at a distance of about three focal lengths. Next the screen is replaced by an empty socket and the real image is observed as if hanging from the socket.
Converging Lens - Object at Short Distance
Image formation for a converging lens with the object at a relatively short distance is demonstrated.
Click the image to watch the video
- Converging lens
- Lens holder
- Frosted 110 V light bulb with arrow
- Power supply (variac)
- Connecting wires
- Jack stand
- Screen
In this demonstration, a frosted light bulb with a vertical arrow drawn on its surface, is operated at low voltage and placed at a relatively short distance beyond the focal point of a converging lens. This way the lens behaves as a projection lens. The nature of the image is observed on a distant screen.
Converging Lens - Magnifier
Image formation for a converging lens with the object distance less than the focal length is demonstrated.
Click the image to watch the video
- Converging lens
- Lens holder
- Frosted 110 V light bulb with arrow
- Power supply (variac)
- Connecting wires
- Jack stand
In this demonstration, a frosted light bulb with a vertical arrow drawn on its surface, is operated at low voltage and placed behind a converging lens. The object distance from the lens is less than the focal length, thus the lens becomes a simple magnifier. The nature of the virtual image is observed as the light bulb is moved within the focal distance.
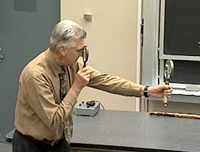
Telescope
Two converging lenses are used to demonstrate a telescope.
Click the image to watch the video
- Two converging lenses of different focal lengths
- Ball with arrow drawn on it
Using a chalkboard diagram, a typical refractive telescope is briefy described. Next two converging lenses, each with a different focal length, are held separated in the hands of the demonstrator to form an astronomical telecope. As the recording camera looks through this telescope, the image of a distant ball is observed to be magnified.